A Snapshot is a point in time copy of volume which is used for backup & recovery. A snapshot is used to create a known state of volume & restore it when needed. In this post we are going to look in to how snapshots can be used as backup of EBS volumes.
Snapshot management consists of number of different steps. Search for volumes which are tagged for backup. Create snapshot of volumes and tag snapshots, add description to snapshots; delete snapshots that are older than the retention period. So, how we can schedule or automate these steps?
We will be using Amazon CloudWatch Events. It allows to automate things based on events happening in AWS infra. CloudWatch Events integrates with AWS Lambda. Meaning you can execute your code with Lambda Function in response to an event or schedule using CloudWatch Events. In this case we are going to have two Lambda Functions; 1. Create snapshots, tag them & 2. Delete snapshots. And these steps should be in sequence.
Saturday, July 16, 2022
Wednesday, April 4, 2018
Visit our new blog
Please visit our new blog for automating various windows, vmware and cloud related tasks.
www.magicpowershell.com
Saturday, August 12, 2017
How to Cast Your Windows or Android Display to a Windows 10 PC
Windows 10’s Anniversary Update brings an interesting new feature: Any PC can now function as a wireless receiver for Miracast, allowing you to view the display from another Windows PC, an Android smartphone or tablet, or a Windows phone.
How to Turn Your PC Into a Miracast Receiver
To turn your PC into a Miracast receiver, just open Windows 10’s Start menu and open the “Connect” app. If you don’t see this app, you need to upgrade to the Anniversary Update.
With the app open, you’ll see a message that your PC is now ready for you to connect wirelessly. That’s it. You don’t need to mess with any firewall or network server settings. Just open the app whenever you want to cast.
On most PCs, you’ll likely see a “This device might have trouble displaying your content because its hardware wasn’t specifically designed for wireless projection” message. The application will still work, but it would likely work better if the PC’s hardware and hardware drivers was specifically designed to function for wireless projection.

How to Cast From Another Windows 10 PC
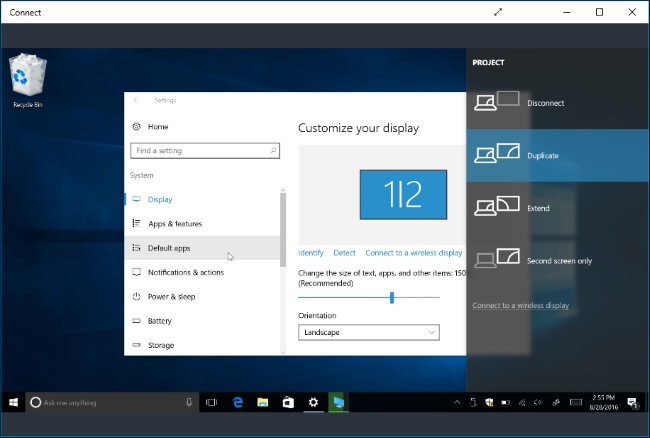
To connect from another PC running Windows 10, head to Settings > Display on that PC and select “Connect to a wireless display”. This setting should be in the same place on a phone running Windows 10 Mobile.
The PC running the Connect app should appear in the list. Click or tap it to connect.

After it connects, you’ll see a few more settings. Enable “Allow input from a keyboard or mouse connected to this display” and the PC functioning as the receiver will be able to interact with the PC through the Connect app.

To change the project mode, select “Change projection mode”. By default, it functions in “duplicate” mode and duplicates the contents of your screen. You can instead choose to extend the screen and treat the remote display as a second monitor, or only use the second screen.
Whichever option you choose, you can enable full-screen mode by clicking the “full screen” button on the window title bar.
How to Cast From an Android Device
To connect from an Android device, you can use the built-in Cast feature…as long as your phone supports it. This is Android, so things aren’t always simple. Your manufacturer may or may not include Miracast support on your phone or tablet. In fact, even Google has removed Miracast support from its latest Nexus devices. But, if your device does support Miracast, this should work.
To cast on Android, head to Settings > Display > Cast. Tap the menu button and activate the “Enable wireless display” checkbox. You should see your PC appear in the list here if you have the Connect app open. Tap the PC in the display and it’ll instantly start projecting.
Don’t see the option here? Your phone or tablet’s manufacturer may have put it in a different place. Look up how to use Miracast on your specific device for more information.

The Settings app is considered “protected content” for security reasons, however, so you’ll have to leave the Settings app before your Android device’s screen will appear in the Connect app. You’ll just see a black screen into the Connect app until then.
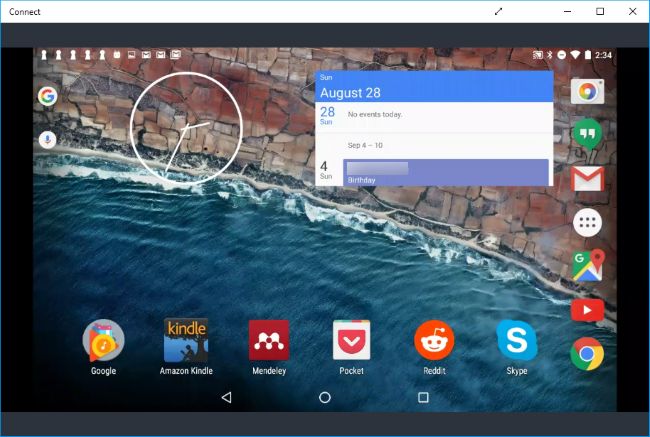
The Connect app will produce notifications that you’ll find an the action center. For example, when we connected an Android device, we saw a message saying protected content can’t be displayed, and that we couldn’t use the mouse on our PC to control the Android device’s screen.

To stop projecting, just close the Connect window on the PC receiving the remote display or end the remote display connection on the device projecting to it
How to find and track Lost Mobile Phone online (Android,iOS and Windows phone)
Losing your mobile phone is one of the biggest loss,no matter how much safely you keep up with your mobile phone,you may lose it anywhere. Lets see,what you can do in order to track and operate your mobile online ,in case you got it lost,using these online tools,you can lock down your phone,cause it to ring,wipe all the data,get current location and so on.
These tracking feature come in-built with various mobile operating systems as well as mobile manufacturers ,you are only required to ensure that sufficient permissions are granted to them on your phone,let’s see how to use these tools.
Android:-
Android Device manager
As long as you remember your Google id and are logged in on the phone with the same ,you can use this tool,Android device manager is an inbuilt security tool,that comes up with android devices,its totally free,using this tool is very simple,you just require an active internet connection on both the devices,using android device manager users can Ring,erase,track and wipe out there phone.
- Initially head to This link ,and login with the same Google account used on your android device,
- Once logged in you can perform various operations related to your device like tracking, ring,lock erase etc.
Windows phone:-
Windows phone also comes with an in-build mobile tracking mechanism using which users can perform various operations upon losing there device(s) ,such as Ring,Lock,erase,get the phone’s current as well as last location and also get the battery percentage of the phone,you just need to login with the same Microsoft account used on your phone.
- Goto This link and login with your Microsoft account,used on the mobile device,
- Now click on the find my phone option and locate or perform other functions.
iPhone:-
Apple also offers tracking services to its iPhone users,WIth the Find my iPhone feature ,you can locate your missing iPhone,iPad and other devices on the map,you can also activate ‘Activation lock’ on your device to ensure that your information remains secure,This feature is applicable for iOS 7 and above.
- Goto This link and sign with your apple id,
- Once you have logged in at iCloud,you can locate and mange your apple device online.
Samsung:-
Find my mobile
Find my mobile is a service for samsung mobile phone users,using this users of samsung smart phones can perform operations such as tracking,wiping etc on their mobile phone remotely,you must have a samsung account ,in order to use this service.
- Goto This link from your PC and click on SIgnin,signin with your samsung account,
- Upon logging in to your samsung account,you will have various options to manage your device.
If you want to create/manage a samsung account from your Device,goto Settings > Accounts and click on Samsung accounts.
How to share your Real time location with friends and family using Google maps
Google has introduced a new location sharing feature for its users,using which users can easily share their real time location with friends and family using the Google maps app,the process is very similar to the find my friends app on the iOS platform,this feature is very effective to let your friends know your current location,you can choose the time duration for which you want your location to be shared,here are the steps to perform location sharing.
Users just need to head to the google maps app and click on the menu lines,select share location option ,configure the time duration and select the contact to share your location,once you configure the location will be shared ,you can also share via message using a link,the steps are as follows.
- Goto the latest version of Google Maps app (Android,iOS) on your mobile,
- Upon installation open the app and click on the Three lines at the top left,
- From their Select the ‘Share location’ option,
- Configure the time duration,and select the people to share location,
- Or directly send the link via sms.
The location will be continuously shared until the time prescribed,you can see the remaining time from the google maps app directly,click on the plus sign to increase the time duration while sharing,you can also configure it to share the location until manually stopped by you,by selecting the ‘until you turn this off’ option.
Saturday, December 26, 2015
How To Trace Location Of Any Person On Facebook
Using command prompt you can actually trace out the ip address of a person you chatting on facebook. Just follow the steps below to proceed.
- First of all start chatting with your friend whose ip address you want to get and make sure that all other apps and background process must be stopped.
- Now press Win+R of your keyboard,
- Now type cmd and hit enter.
- Now in the command prompt that appears type netstat -an and hit enter.
- Now note down the ip address of person.
- Now you need to scan that ip address to know the actual location of the person that you can checkout from http://www.ip-adress.com/ip_tracer/.
How To Hide Whatsapp Images & Videos From Gallery
When you are connected to wifi network some of your whatsapp content get auto download which you might not want to download and these media appears in gallery which sometime gives bad impression of yours on the person who may checking your gallery. So to avoid this just follow the method to hide whatsapp content from gallery. jsut follow the below steps to proceed.
- First of all open File Explorer of your device.
- Now navigate to Whatsapp folder in the file manager.
- Now open the folder named Media there.
- Now there you will see all the folder of your whatsapp content including whatsapp images and whatsapp videos.
- Now rename the folder Whatsapp images to .Whatsapp images, if you want to hide whatsapp images from gallery.
- Rename Whatsapp Videos to .Whatsapp Videos, if you want to hide whatsapp video files from your gallery.
- Now open settings-> Apps manager and there you will find gallery in theAll section, click on it.
- Now scroll little down and click on clear cache.
- Thats it you are done, now open your gallery and you will see that the whatsapp content will not be displayed there.


So the above is all about Hide Whatsapp Images & Videos From Gallery. By this you can easily ensure your privacy and can avoid many embarrassing situations. And also you can rename that folder back to original names too if you want to display them back in gallery.
Tuesday, December 15, 2015
Jugnoo Autos : Refer And Win Iphone 6S This New Year
Jugnoo Autos is a new Auto service with which you can travel to your favourite destination at free of cost. Its similar to OLA cabs and Uber. But Jugnoo Autos are much cheaper as compared to other cab services.
Jugnoo Autos refer and earn offer : Refer friends to Jugnoo Autos and win an iphone 6S this new year . Also earn Rs 50 Jugnoo cash for each friend who joins. Your friend too gets Rs 50 on signup . Offer is valid till 31st december 2015

How to get free rides with Jugnoo Autos
1. Download the Jugnoo Autos app from playstore Click here
2. Install the app and sign up with name , email , mobile number
3. Enter promocode : MAYANK306720
4. Click signup . You will get Rs 50 Jugnoo cash instantly
5. This Jugnoo cash can be used to give you a free ride
How to win Iphone 6S :
1. Refer your friends to Jugnoo Autos . Click on Free rides >> Share your refer code with your friends
2. You will get 1 point for every 10 friends i.e 20 friends = 2 points and so on.
3. Higher the points you have higher the chance you have to win iphone 6S
4. Start Sharing
Terms and Condition :
1. The contest will end at 5 p.m on 31st december 2015
2. Its not necessary for the new user to take the ride immediately
3. Winners will be announced at 7.30 p.m on 31st december
4. The usual referral program stays active i.e you share your referral code , your friend takes the first ride and you both get Rs 50 Jugnoo cash
Saturday, June 27, 2015
GET 100% cashback on ordering food from TINYOWL
Good News for first time users! Order delicious food on Tinyowl app and get 100% Cashback. Maximum cashback of Rs 150 is applicable on order. Use the below given Tinyowl coupon code at the time of order to avail this Exclusive offer. This is Valid only on Card/PayTM/Netbanking. Happy Food Ordering!
Use Promo Code: MAYANK6B1
Use Promo Code: MAYANK6B1
Monday, June 15, 2015
GET $20 FREE TAXI RIDE
STEPS TO GET $20 WORTH TAXI RIDE FOR FREE:
1.Download the uber app for ANDROID | WINDOWS | I OS
2.Once downloaded and installed just register for an account at UBER.
3.In the next page enter the name, phone number, mail and password.
4.Click on next, and in the next page select PROMO CODE which is found at the top right corner.
5.Enter the promo code as "MAYANKA197"
6.Now – Click on “Add prepaid wallet”. You can use your credit card details.
1.Download the uber app for ANDROID | WINDOWS | I OS
2.Once downloaded and installed just register for an account at UBER.
3.In the next page enter the name, phone number, mail and password.
4.Click on next, and in the next page select PROMO CODE which is found at the top right corner.
5.Enter the promo code as "MAYANKA197"
6.Now – Click on “Add prepaid wallet”. You can use your credit card details.
7.Once the Credit card is added your uber app is ready now.
8.You could find the $20 has been credited in the promotion option of the app.
9.Hurray you can roam around the city for free of cost with that $20.
Friday, May 15, 2015
Download Flipkart App and get 50 Rs Mobiwik Coupon
Download flipkart shopping app using this link. After installing the app, you will also get Mobikwik cashback coupon worth 50 Rs!
Steps to get 50 Rs Mobiwik cashback coupon
1. Click the below link to download flipkart app.
2. After downloading the app by clicking on the above link just login or signup to the flipkart account to get your mobiwik coupon.
Enjoy!!!!
Sunday, April 26, 2015
Sunday, November 2, 2014
Get Free Cashback on your Mobile Recharge
Paise kya ped pe ugte hai? -Yes ! So use FreeCharge promocode R6RY88B & get Rs.50 Instant Cashback on your next Mobile Recharge. Redeem on : http://frch.in/refer. Code valid only once per debit/credit card & user.
Friday, October 3, 2014
Just download Snapdeal mobile app and get Freecharge 50 Rs credits along with 50 Rs snapdeal credits
To avail this offer just goto Freecharge app on your mobile,initiate a recharge for 10 Rs or more,choose or skip the coupons,and make the payment using debit card,credit card,net banking or freecharge credits,after the recharge completes scroll down and click on a banner you see at the bottom,follow up the instructions and download the app to get the credits.
How to get free 50 Rs SD cash(Snapdeal cash):-
To get free 50 Rs SD cash ,just download the snapdeal app on your mobile,after downloading it open it and in the invitation code type FREECHARGE 50 Rs SD cash will get added to your snapdeal account.
Other details:-
1)Offer valid only for Freecharge app users,also valid for recharges using Freecharge credits,
2)The user must download and install the Snapdeal app for first time,
3)You get earn a total of 100 Rs (50+50) ,50 Rs in freecharge and 50 in snapdeal,
4)Offer valid only for a limited period of time,
5)Freecharge credits will get added up in 72 hours while the snapdeal cash will reflect up immediately.
Saturday, September 27, 2014
Unlock your Pattern Locked Android Phone
Forgot Pattern Lock?
Follow the below steps to unlock your android phone when it got locked due to incorrect attempts.
Prerequisite
- 1. ADB drivers must be installed on your system
- 2. USB Debugging Mode should be “ON”
Now What you needs to do.
- 1. Connect your Android device via USB cable to PC.
- 2. You must now open the folder where you installed ADB driver.
Now you just have to click right on the screen’s blank area by holding down the shift key and select “OPEN COMMAND WINDOW HERE”.
- 3.A window command will prompt and then you just need to type the following commands:
- adb shell
- 4.Once it has been done then you have to reboot your android device.
- 5.Now it is all done and set your Android Phone is now unlocked.
Thursday, September 25, 2014
How to Run Android apps on Windows
1) Download and Install BlueStacks .

2) Once you downloaded BlueStacks you can then download and use any android apps and run it on your PC. If you’re looking for a specific app , click on App search and type the name of the app in the search bar . Click on it and download+installing process will begin .
 |


3) Once you finished installing the app you can then run it by clicking the app icon .


How to sync your Android phone with PC
BlueStacks also lets you synchronize apps, photos and SMS messages between your phone and PC? Here’s how to do it:1) If you want to sync your Android phone with PC. Go to Settings and click on Cloud Connect .


2) Set up your BlueStack account
 |


3) Install the BlueStacks Cloud Connect app from Play Store to your phone.
4)Open the app and pair your phone with your PC by typing in your PIN:
5)Select whether or not you want to receive SMS messages simultaneously on your PC via BlueStacks . Click “Login” and you are done!
Run commands for Windows
Some run command for Windows that you will be interested in. To run those commands Press Windows+R key which will open the Run window then type any of the below command according to your need.

